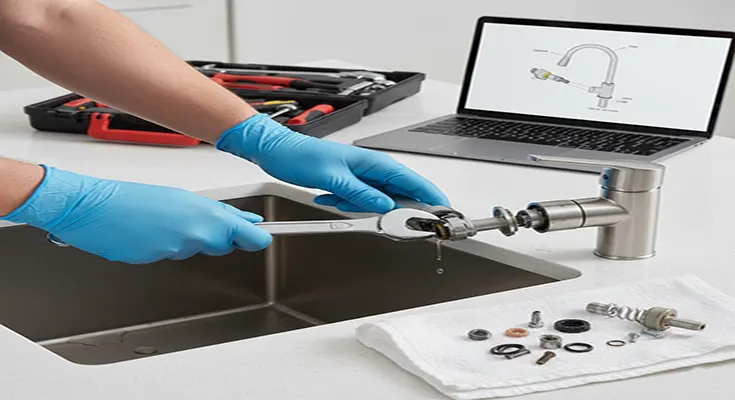
Essential Fall Home Maintenance Checklist for Cold Weather Preparation

Essential Fall Home Maintenance Checklist for Cold Weather Preparation

As the vibrant colors of autumn begin to fade, it’s a clear signal that cold weather preparation needs to move to the top of your home maintenance checklist. Taking proactive steps now can save you from costly repairs, energy waste, and discomfort when winter’s chill arrives. This essential fall home maintenance checklist will guide you through the crucial tasks to ensure your home is warm, safe, and efficient throughout the colder months.

💧 Protect Your Plumbing and Water Systems

One of the most common and damaging issues in winter is frozen pipes.

  • Drain and store hoses: Disconnect all outdoor hoses, drain them completely, and store them in a garage or shed.
  • Shut off exterior water faucets: Locate the shut-off valve for your exterior spigots and turn them off. If your faucets aren’t “frost-free,” open the exterior tap after shutting off the interior valve to drain any remaining water.
  • Insulate
Essential Fall Home Maintenance Checklist for Cold Weather Preparation Read More
Immediate Action: Emergency Roof Shingle Repair After High Wind Damage

Immediate Action: Emergency Roof Shingle Repair After High Wind Damage

High winds can swiftly tear shingles from your roof, leaving your home vulnerable to immediate and catastrophic water damage. The priority during a sudden roof emergency is to prevent water intrusion while you await professional help. This guide provides steps for safe, temporary emergency roof shingle repair after high wind damage.

Step 1: Safety and Assessment from the Ground

Before you even touch a ladder, assess the danger and the scope of the problem.

  • Check for Dangers: Scan the area for downed power lines, unstable tree limbs, or other hazards. Ensure your ladder has a secure, level footing if you must climb.
  • Assess the Damage: Use binoculars or a camera zoom feature from the ground or a safe upstairs window to identify the specific damage: missing shingles, lifted shingles (creased or peeled back), and areas of heavy granular loss (which indicates the shingle’s protective layer is gone).

Temporary

Immediate Action: Emergency Roof Shingle Repair After High Wind Damage Read More
Seal the Elements: The Best Caulk for Repairing Leaks Around Exterior Window Frames

Seal the Elements: The Best Caulk for Repairing Leaks Around Exterior Window Frames

Leaking or cracked sealant around your exterior window frames is more than just a cosmetic issue. Failed caulk leads to significant energy loss, invites drafts, and, most critically, allows water intrusion that can cause costly damage, wood rot, and mold growth inside your walls. Choosing the right material for repairing leaks around exterior window frames is essential for a durable, long-lasting seal that stands up to weather and temperature changes.

The goal is to find a caulk that offers superior durability, adhesion, and flexibility. We’ll compare the top professional-grade options to help you select the best caulk for the job.

The Top Contenders: Silicone vs. Polyurethane

For exterior window perimeters—an area subject to constant movement (expansion and contraction)—only highly flexible, durable sealants should be used. The two leaders are 100% silicone and polyurethane.

Caulk TypeProsCons
100% SiliconeSuperior flexibility; excellent waterproofing; highly resistant to $\text{UV}$ and
Seal the Elements: The Best Caulk for Repairing Leaks Around Exterior Window Frames Read More
Silence the Squeak: DIY Repair for Noisy Chain Drive Garage Door Openers

Silence the Squeak: DIY Repair for Noisy Chain Drive Garage Door Openers

The grinding and clanking from a chain drive garage door opener isn’t just irritating—it’s a sign that essential components are loose, dry, or stressed. Ignoring the noise can lead to costly repairs down the road. Fortunately, most excessive noise in a chain drive model can be fixed quickly and cheaply with a simple DIY repair for noisy garage door openers chain drive model.

We’ll focus on the three main culprits: lack of lubrication, incorrect chain tension, and loose mounting hardware.

Mandatory Safety Warning: Before performing any maintenance, unplug the garage door opener from the electrical outlet. Always wait a few minutes after unplugging to ensure residual power has dissipated.

Step 1: Lubrication — The Easiest Fix

The most common source of noise is simple metal-on-metal friction. Proper lubrication eliminates squeaks and significantly extends the life of the entire system.

  1. Use the Right Lube: Do not use WD-40; it
Silence the Squeak: DIY Repair for Noisy Chain Drive Garage Door Openers Read More
Smooth Walls Again: A Step-by-Step Guide to Repairing Drywall Cracks from Settling

Smooth Walls Again: A Step-by-Step Guide to Repairing Drywall Cracks from Settling

Drywall cracks caused by house settling or temperature changes are frustratingly common. While easy to cover with a dab of spackle, these stress cracks will often reappear because the underlying structural movement hasn’t been accounted for. To achieve a true permanent drywall crack repair, you need to reinforce the area.

This step-by-step guide to repairing drywall cracks from settling details the professional method using the right materials and techniques to ensure your walls stay smooth for good.

Step 1: Preparation is Key (V-Grooving the Crack)

The most common mistake is patching over a hairline crack. For a repair to last, the compound needs to adhere deeply.

  1. Safety First: Put on safety glasses and a dust mask.
  2. Open the Crack: Use a sharp utility knife to carefully cut along the length of the crack, creating a slight bevel or a shallow “V” shape. This V-groove allows the repair compound to
Smooth Walls Again: A Step-by-Step Guide to Repairing Drywall Cracks from Settling Read More