

High winds can swiftly tear shingles from your roof, leaving your home vulnerable to immediate and catastrophic water damage. The priority during a sudden roof emergency is to prevent water intrusion while you await professional help. This guide provides steps for safe, temporary emergency roof shingle repair after high wind damage.
Step 1: Safety and Assessment from the Ground
Before you even touch a ladder, assess the danger and the scope of the problem.
- Check for Dangers: Scan the area for downed power lines, unstable tree limbs, or other hazards. Ensure your ladder has a secure, level footing if you must climb.
- Assess the Damage: Use binoculars or a camera zoom feature from the ground or a safe upstairs window to identify the specific damage: missing shingles, lifted shingles (creased or peeled back), and areas of heavy granular loss (which indicates the shingle’s protective layer is gone).
Temporary Fix: Plastic Sheeting and Tarps
For widespread damage, major holes, or an active leak, a tarp is the fastest and safest temporary solution to achieve roof leak prevention.
- Placement: Spread a large, heavy-duty plastic tarp or sheet of polyethylene plastic over the damaged area. The tarp must extend several feet past the damage in all directions, particularly at the highest point of the roof, to ensure water runs onto the tarp, not underneath it.
- Securing the Tarp:Never nail through the center of the tarp, as this defeats the purpose of waterproofing.
- Roll the edges of the tarp around long lumber pieces (2x4s).
- Secure the lumber by fastening it to non-critical, stable surfaces like the eaves or fascia board, or simply use heavy weights (sandbags, bricks) to anchor the tarp edges. The goal is tension that prevents the wind from lifting the covering.
Short-Term Repair: Lifted or Missing Shingles
For localized damage, you can use common materials for a patch.
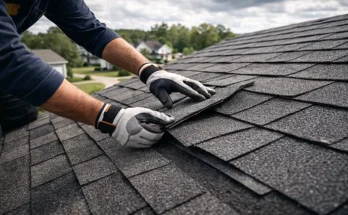
- Repairing Lifted Shingles: Wind often pries shingles upward, breaking the asphalt seal. Use a flexible roofing cement (also called plastic cement or roofing tar) from a caulking gun.
- Gently lift the shingle only as far as necessary.
- Apply a small bead of the roofing cement underneath the shingle where the seal broke.
- Press the shingle down firmly and place a weight on it for several hours to ensure the cement bonds.
- Patching Missing Shingles: If a shingle is completely blown off, use a piece of sheet metal or aluminum flashing (about the size of the missing shingle) as a temporary water barrier.
- Slide the flashing underneath the shingle in the row above the damaged area.
- Secure the flashing with two roofing nails placed only at the very top edge, ensuring the nails are hidden by the shingle in the row above it.
These techniques provide an immediate temporary roof fix to mitigate water damage, but they are not permanent replacements. Once the immediate weather threat passes and the area is safe, document the damage thoroughly for insurance purposes. A full professional inspection is mandatory to check for underlying structural issues and install permanent, warrantied repairs.